#amigurumi #freepattern #freepatternamigurumi #crochettoppattern #crochet #crochetpattern #amigurumiswan #crochetswan
What does amigurumi means?
The word Amigurumi comes from Japanese. The Japanese call handicrafts knitted with crochet and needle as Ami. The Japanese call the toys that are filled with objects such as fibers or cotton as Nuigurumi. The word Amigurumi is derived as a combination of these two words.
Amigurumi knitting techniques are very easy. You can find many handcrafts prepared with these techniques on my site. What is Amigurumi for beginners in Amigurumi handwork? How to knit amigurumi? In this blog, where you can find the answers to the questions with pictures, you will be able to learn about Amigurumi in all details.
I share in this blog are amigurumi cats, amigurumi dogs, amigurumi fish, amigurumi unicorn, amigurumi penguins, amigurumi parrot, amigurumi giraffe, amigurumi pigs, amigurumi bunnies, amigurumi cows, amigurumi sheeps, amigurumi bees, amigurumi dolls, amigurumi snakes, amigurumi mice, amigurumi elephants, amigurumi pumpkins, amigurumi pandas, amigurumi owls, amigurumi cartoon characters, amigurumi twetters, amigurumi caterpillars and more …
Also I’m sharing new amigurumi free patterns every day.
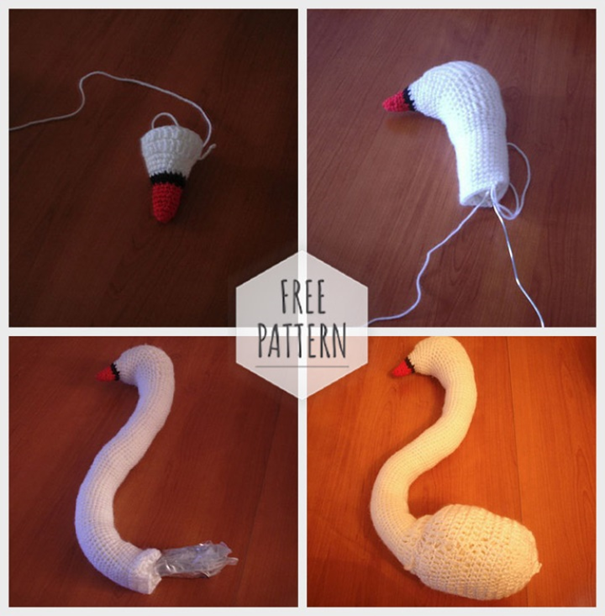
Todays daily new amigurumi free crochet pattern is Swan
I want to give you some informations about this pattern ;
Materials:
3.25mm hook (I use THESE hooks!);
Bernat Velvet in White Sand (less than one 300g skein);
Bernat Velvet in Blackbird (small amounts);
Loops & Threads Impeccable in Orange Crush (small amounts);
Bernat Handicrafter Crochet Thread in black for eyes;
Black sewing thread and sewing needle (for eyes – optional)
Stuffing;
Tapestry needle;
Stitch markers.
Terms and Stitches:
Ch – Chain
Slst – Slip stitch
Sc – Single crochet
Inc – Increase. Work a regular sc increase.
Dec – Decrease. Work a regular sc decrease.
Hdc – Half double crochet
Body:
Using a 3.25mm hook and White. Ch 1 and turn at the end of each row, unless specified otherwise.
Row 1: Ch 21, sc 20, ch 6, turn (20 sts + 6 chs)
Row 2: Starting in 2nd ch from hook, sc 5 along chs, continue across row, sc 20, ch 4, turn (25 sts + 4 chs)
Row 3: Starting in 2nd ch from hook, inc in first ch, sc 2 across rem chs,
continue across row, sc 23, inc twice (31 sts)
Row 4: Inc twice, sc 29 (33 sts)
Row 5: Inc, sc 30, inc twice (36 sts)
Row 6: Inc, sc 35 (37 sts)
Row 7: Inc, sc 35, inc (39 sts)
Row 8: Inc, sc 38 (40 sts)
Row 9: Sc 39, inc (41 sts)
Row 10: Inc, sc 40 (42 sts)
Row 11: Sc 41, inc (43 sts)
Row 12: Sc across (43 sts)
Now we will start the neck. You will be crocheting only part way across the previous row before chaining and turning.
Row 13: Sc 8 (8 sts)
Row 14: Sc 6, dec (7 sts)
Row 15: Sc across (7 sts)
Row 16: Inc, sc 6 (8 sts)
Row 17: Dec, sc 6 (7 sts)
Row 18: Inc, sc 6 (8 sts)
Row 19: Dec, sc 6 (7 sts)
Row 20: Inc, sc 4, dec (7 sts)
Row 21: Sc 6, inc (8 sts)
Row 22: Inc, sc 5, dec (8 sts)
Row 23: Dec, sc 5, inc (8 sts)
Row 24: Inc, sc 5, dec (8 sts)
Row 25: Dec, sc 5, inc (8 sts)
Row 26: Inc, sc 5, dec (8 sts)
Row 27: Dec, sc 5, inc (8 sts)
Row 28: Inc, sc 5, dec (8 sts)
Row 29: Dec, sc 5, inc (8 sts)
Row 30: Sc 6, dec (7 sts)
Row 31: Dec, sc 4, inc (7 sts)
Row 32: Inc, sc 4, dec (7 sts)
Row 33: Dec, sc 5 (6 sts)
Row 34: Inc, sc 3, dec (6 sts)
Row 35: Dec, sc 4 (5 sts)
Row 36: Inc, sc 2, dec (5 sts)
Rows 37-41: Sc across (5 sts)
Row 42: Dec, sc 2, inc (5 sts)
Row 43: Inc, sc 4 (6 sts)
Mediavine
Row 44: Dec, sc 2, inc twice (7 sts)
Tie off.
Head:
With 3.25mm hook and white. Ch 1 and turn at the end of each row.
Row 1: Ch 4, sc 3 (3 sts)
Row 2: Inc, sc 1, inc (5 sts)
Row 3: Inc, sc 3, inc (7 sts)
Row 4: Sc across (7 sts)
Row 5: Sc 6, inc (8 sts)
Row 6: Sc across (8 sts)
Now we will join both the head and the neck together by crocheting across both in the next row. Ch 1 and turn.
Swan assembly
Swan assembly
Row 7: Sc 7, inc, continue crocheting across neck, sc 7 (16 sts)
Row 8: Dec, sc 12, dec (14 sts)
Row 9: Dec, sc 10, dec (12 sts)
Row 10: Dec, sc 8, dec (10 sts)
Row 11: Dec twice, sc 2, dec twice (6 sts)
Row 12: Dec three times (3 sts)
Tie off.
Finish Body:
Now we will go back and finish the body (we’re starting at row 13 because that’s where we stopped previously before starting the neck). With 3.25mm hook and white yarn. Ch 1 and turn at the end of each row.
With the neck on the right, skip 1 st next to the neck and join your yarn into the next st.
Swan panel
Swan panel
Mediavine
Row 13: Sc 33, inc (35 sts)
Row 14: Sc 1, slst 4, sc 30 (35 sts)
In the next row, we will crochet only part way across the previous row before chaining and turning.
Row 15: Dec, sc 26 (27 sts)
Row 16: Dec, sc 25 (26 sts)
Row 17: Dec, sc 22, dec (24 sts)
Row 18: Dec, sc 20, dec (22 sts)
Row 19: Dec, sc 16, dec twice (19 sts)
Row 20: Dec, sc 13, dec twice (16 sts)
Row 21: Dec twice, sc 10, dec (13 sts)
Row 22: Dec twice, sc 5, dec twice (9 sts)
Tie off.
Beak:
With 3.25mm hook and black velvet yarn, join your yarn in a stitch at the bottom of the head.
Row 1: Sc 4 (4 sts)
Row 2: Sc 1, dec, sc 1 (3 sts)
Switch to Orange (NOTE: I used a worsted weight yarn and DOUBLED it up so that it was as thick as the velvet yarn).
Rows 3-4: Sc 3 (3 sts)
Row 5: Sc, dec (2 sts)
Row 6: Dec (1 st)
Row 7: Sc 1 (1 st)
Tie off.
Repeat all of the above for the back panel. When crocheting the beak on the back panel, make sure you crochet it in the SAME four stitches as you did for the front panel so that they line up perfectly.
Move on to assembly below!
Assembly
Step 1: Eye
The first thing we need to do is stitch on the eye. I used a sewing needle and black sewing thread to stitch crochet thread in place to give the eye a nice curve.
Feel free to add eyelashes or use a safety eye instead.
Step 2: Body
These are the pieces you’ll have at this step:
Place the two panels together matching up all sides. Make sure the front is facing you as you crochet around.
Starting on the left side of the body, begin attaching the panels together. Insert your hook into both panels, chain 1, and then single crochet around the outside of the panels starting in white.
When crocheting around, try to crochet with a looser tension than usual. Crocheting loosely, especially around the curved areas, helps keep all the edges curved.
[Sc, ch 1, sc] in the tip of the tail.
Continue to crochet down around the bottom and up the other side. Begin stuffing the body, particularly at the bottom of the neck.
Crochet all the way up the neck and around the bottom of the head. Switch to black and then orange yarn when crocheting around the beak. [Sc 1, ch 1, sc} in the tip of the beak. Remember, if you are using a worsted weight for the orange yarn, you will need to double it up!
Switch back to white. Stuff the beak and head. Continue to crochet around the top of the head, stuffing as you go.
Continue crocheting down the neck. You will need to stop and stuff after every 4 or 5 stitches (trust me on this). Make sure the stuffing is very firm so that the neck is strong enough to withstand its own weight.
When you reach the bottom of the neck, top up stuffing in the body. Continue crocheting across the top of the body, topping up stuffing as you go.
When you are satisfied with the stuffing, close with a slst and tie off. Poke yarn tails back inside the piece.
You’re done!

Amigurumi Bear Amigurumi Bear Free Pattern Amigurumi Bull Amigurumi Bunny Amigurumi Bunny Free Pattern Amigurumi Cake-Bear Free Pattern Amigurumi Cake-Bear Free Pattern Crochet Amigurumi Cat Amigurumi Cat Free Pattern Amigurumi Dog Amigurumi Dog Crochet Amigurumi Dog Free Pattern amigurumi doll Amigurumi Doll Free Pattern Amigurumi Girl Amigurumi Girl Free Pattern Amigurumi Monkey Bear Bear Amigurumi Bear Free Amigurumi Pattern Bunny Bunny Crochet Cat Amigurumi Cat Amigurumi Free Pattern Cat Crochet Cow Amigurumi Cow Amigurumi Free Crochet Pattern Cow Crochet Crochet Bear Dog Crochet Fox Amigurumi Fox Amigurumi Free Pattern Fox Crochet girl Girl Crochet Hippo Amigurumi Hippo Amigurumi Free Pattern Hippo Crochet Mouse Amigurumi Mouse Crochet Reindeer Amigurumi Reindeer Amigurumi Free Pattern Unicorn Amigurumi Unicorn Amigurumi Free Pattern Unicorn Crochet